Welcome

You Made a GREAT Decision!
Now, before you start going through the training... Make sure you believe you can succeed.
"AutoBlogAI" has everything you need in order to see success!
Tutorials & Training
AI Settings
OpenAI API Key
OpenAI

To generate an OpenAI API key, you will first need to sign up for an account on the OpenAI platform.
Here are the steps:
- Visit the OpenAI Platform sign-up page at https://platform.openai.com/signup.
- Fill in your personal information, including your full name, email address, and password.
- Read and accept the terms of service and privacy policy.
- Click on the Create Account button.
- You will receive an email from OpenAI containing an account activation link. Click on the link to activate your account.
- After activating your account, log in to the OpenAI Platform at https://platform.openai.com/login.
- Click on the API Keys tab in the left-hand sidebar or visit https://platform.openai.com/account/api-keys directly.
- Click on the Create an API key button.
- Enter a name for your API key. This name will help you identify the key later (e.g., "My First API Key").
- Click on the Create button.
- Your OpenAI API key will now be generated and displayed in the API Keys section. The key will be a long alphanumeric string, such as
sk_1234567890abcdef1234567890abcdef. - To update it, go to the Settings - AI Engine tab and paste your API key into the designated field and hit Save button.
Error Codes and Solutions
This list provides an overview of common error codes and their corresponding solutions.
Each error code is explained in detail in its own dedicated section.
Please note that, all these errors are generated by the OpenAI API and not.
| Error | Cause | Solution |
|---|---|---|
| 401 - Invalid Authentication | Invalid Authentication | Ensure the correct API key and requesting organization are being used. |
| 401 - Incorrect API key provided | The requesting API key is not correct. | Ensure the API key used is correct, clear your browser cache, or generate a new one. |
| 401 - You must be a member of an organization to use the API | Your account is not part of an organization. | Contact OpenAI to get added to a new organization or ask your organization manager to invite you to an organization. |
| 429 - Rate limit reached for requests | You are sending requests too quickly. | Pace your requests. Read the Rate limit guide. |
| 429 - You exceeded your current quota, please check your plan and billing details | You have hit your maximum monthly spend (hard limit) which you can view in the account billing section. | Apply for a quota increase from OpenAI. |
| 429 - The engine is currently overloaded, please try again later | OpenAI servers are experiencing high traffic. | Please retry your requests after a brief wait or contact OpenAI. |
| 500 - The server had an error while processing your request | Issue on OpenAI servers. | Retry your request after a brief wait and contact OpenAI if the issue persists. Check the status page for updates. |
For more information, please visit the OpenAI API Reference.
You can use instead of OpenAI:
Azure

Operates on a Bring Your Own Key basis, which means it serves as a bridge between your WordPress site and Azure OpenAI services..
In order to use AutoBlogAI, you need to have an Azure account and purchase API credits from Azure.
With this approach, users are required to provide their own Azure API key to access AutoBlogAI functionality. This ensures that users maintain full control over their API keys and guarantees access to the latest, most advanced language processing technology offered by Azure OpenAI.
How to Generate an Azure OpenAI API Key
Azure OpenAI Service is a powerful tool integrated into the Azure ecosystem. Here's how you can get started with it:
Registration
Azure OpenAI Service, despite being generally available, still requires users to register. Microsoft might restrict access based on availability and other eligibility criteria.
Application Process
- Visit Azure OpenAI Service.
- Click on the
Apply Nowbutton. - Complete the form that appears. Make sure to use your work email address; personal emails like Gmail or Hotmail might decrease your chances of approval.
Awaiting Approval
After submission, Microsoft will review your request. Once approved, they will inform you about the access.
Accessing Azure Portal
- Navigate to Azure Portal.

Operates on a Bring Your Own Key basis, which means it serves as a bridge between your WordPress site and Google AI services..
In order to use AutoBlogAI, you need to have an Google account and purchase API credits from Google.
With this approach, users are required to provide their own Google API key to access AutoBlogAI's functionality.
This ensures that users maintain full control over their API keys and guarantees access to the latest, most advanced language processing technology offered by Google.
Generate Google API Key
Generating a Google API key is a straightforward process. Here's a step-by-step guide to help you create your API key:
- Open your web browser and go to https://aistudio.google.com/app/apikey page.
Writing & Format
Language
Express Mode boasts support for an impressive 42 languages.
The supported languages include Afrikaans, Arabic, Armenian, Bosnian, Bulgarian, Chinese (Simplified), Chinese (Traditional), Croatian, Czech, Danish, Dutch, English, Estonian, Filipino, Finnish, French, German, Greek, Hebrew, Hindi, Hungarian, Indonesian, Italian, Japanese, Korean, Latvian, Lithuanian, Malay, Norwegian, Polish, Portuguese, Romanian, Russian, Serbian, Slovak, Slovenian, Spanish, Swedish, Thai, Turkish, Ukrainian, and Vietnamese.
By default, the plugin is set to the English language. However, you can easily change the language, style, and tone to suit your needs by navigating to the Language, Style and Tone tab.
In this easy-to-follow tutorial, we'll show you how to change the language for the Content Writer in just a few steps.
- To begin, go to your dashboard and locate the plugin menu.
- In the menu, click on the Settings option, and then choose the Content tab.
- Inside the Content tab, you will find a section titled Writing & Format This is where you can modify the language settings.
- In the "Writing & Format" section, locate the dropdown list called Language. Click on it to reveal the available language options. Select the language you want to use for your content.
- After choosing your desired language, click on the Save button to apply your selection. Your chosen language will now be set as the default for both the Content Writer and Auto Content Writer features.

Headings
Adding headings to your content is an essential way to structure your article or blog post, making it more readable and navigable for your readers.
Number of Headings
You can specify how many headings you would like to include in your content.
The default number is 3, but you can choose anywhere between 1 and 15 headings.
However, please note that each request to generate ideas or outlines for a heading will take around 20 seconds. Therefore, we recommend keeping the number of headings between 1 to 5 to avoid longer content generation durations, which may result in a timeout if the server has a limit on the length of time a request can take.
The number of headings determines the number of ideas or outlines that will be generated.
For example, if you enter the title "Mobile Phones" and specify 5 headings, the plugin will send a request to OpenAI and get 5 ideas or outlines for an article about mobile phones.
INFO
Keep in mind that a higher number of headings will require more requests to the server, which may result in longer waiting times and possible timeouts.
To set the number of headings in your content:
- Go to Settings - Content in the plugin menu and find the Headings section.
- Enter a value between 1 and 15 in the Number of Headings field. For example, if you enter 5, will generate your content with 5 headings.
- Click Save to apply the changes.

Heading Tag
To choose the appropriate heading tag for your content:
- Go to Settings - Content in the plugin menu and find the Headings section.
- From the dropdown list called Heading Tags, select your desired tag. Options range from H1 to H6.
- Click Save to apply the selected tag to your headings.

Images
You can add images to your content using OpenAI’s DALL-E model, Pexels or Pixabay.
Here's an overview of the four available options for adding images to your content:
- DALL-E (AI-generated images): Create unique and contextually relevant images using OpenAI's DALL-E model.
- Pexels: Access a vast library of high-quality and royalty-free images from the Pexels platform.
- Pixabay: Utilize the extensive collection of free-to-use images available on Pixabay.
- None: Choose this option if you don't want to add any images to your content.
Adding an Image
- Go to Settings - Image tab.
- Select the Image Source you want to use. This will add an image to the content.

Please note the distinction between the two image sources:
- Image Source: This option determines which platform (DALL-E, Pexels, Pixabay, or None) will be used to insert images directly into your post. The selected images will be added to your content based on the configured settings.
- Featured Image Source: This option determines the source of the featured image for your post. The featured image typically serves as a visual representation of the post's content and is displayed prominently on your website, such as in the blog index or social media previews.
Understanding the difference between these two settings will help you better manage the visual elements of your content and create a more engaging user experience.

Using DALL-E
Note: Make sure you have already entered your OpenAI API key in the Settings - AI Engine tab API Key field, as the DALL-E image generation works with the API key.
- Go to the Settings - Image tab and select the DALL-E image source.

Image Size
For DALL-E 2, you can choose from three image sizes:
- Small (256 x 256)
- Medium (512 x 512)
- Large (1024 x 1024)
However, DALL-E 3 introduces additional sizes and the option for HD quality:
- Large (1024 x 1024)
- Wide (1792 x 1024)
- Tall (1024 x 1792)
The HD quality is available when using the DALL-E 3 HD model.

Using Pixabay
you can enhance your articles with high-quality images from Pixabay, a leading platform for sharing beautiful, royalty-free images, illustrations, and vector graphics.
To start using this feature, follow these simple steps:
- Obtain a Pixabay API Key: First, you’ll need to sign up for a free Pixabay account (if you don’t already have one) and get your API key. Visit Pixabay’s API documentation for more information on how to get your API key.

- Go to the Settings - Image tab and make sure to select Pixabay as both the image source and featured image source if you plan to use it for both purposes.
- Paste your API key into the Pixabay API key field.
- Click Save to apply your choice.

Using Pexels
To begin using this feature, follow these simple steps:
- Obtain a Pexels API Key: First, sign up for a free Pexels account (if you don't already have one) and get your API key.

- Go to the Settings - Image tab and ensure to select Pexels as both the image source and featured image source if you intend to use it for both purposes.
- Paste your API key into the Pexels API key field.
- Click Save to apply your choice.

SEO
SEO Optimization

Shorten URL
The Shorten URL feature will automatically compress the URL of your generated content, making it easier to share and more appealing to potential visitors.
Go to Settings -> SEO tab in the plugin menu and look for the Shorten URL checkbox. Check it to enable and uncheck it to disable the feature.
Generate Title from Keywords
This feature automatically generates a compelling and SEO-friendly title for your content, based on the keywords you provide.
Navigate to Settings -> SEO tab in the plugin menu. Here you'll find the Generate Title from Keywords checkbox. Enable it by checking the box and disable it by unchecking.
Include Original Title in the Prompt
This feature allows you to integrate the original title of your content into the generation prompt.
This is especially useful for retaining the core essence or subject matter of your content while generating new variations or extensions of the title for SEO purposes.
Example:
- Original Title: How to Grow Indoor Plants
- Keywords: Houseplants, Growth, Tips
- Generated Title without Original Title in Prompt: The Ultimate Guide to Houseplant Growth: Tips and Tricks
- Generated Title with Original Title in Prompt: How to Grow Indoor Plants: Essential Tips for Thriving Houseplants
By incorporating the original title into the prompt, you're more likely to generate a title that is closely aligned with the original content, making it relevant while still being optimized for SEO.
This feature is particularly useful for content creators who want to refresh older content titles without straying too far from the original topic or focus.
Enforce Focus Keyword in URL
When enabled, this feature ensures that your focus keyword is included in the URL of your generated content, enhancing SEO value.
However, it's essential to note that this feature will only work if you have added keywords in your content generation process.
To toggle this feature, go to Settings -> SEO tab in the plugin menu and find the Enforce Focus Keyword in URL checkbox. Check to enable, uncheck to disable.
Use Sentiment in Title
This feature aims to make your title more clickable by incorporating words or phrases that evoke strong emotions.
Go to Settings -> SEO tab in the plugin menu and look for the Use Sentiment in Title checkbox. Check the box to enable and uncheck it to disable the feature.
Use Power Word in Title
Power Words are proven to make titles more compelling and can significantly increase click-through rates. This feature ensures that at least one Power Word is included in your title.
Navigate to Settings -> SEO tab in the plugin menu. Here you'll find the Use Power Word in Title checkbox. Enable this feature by checking the box and disable it by unchecking.
How to Use Content Writer Express Mode
Generating Content
Express Mode is a feature that allows you to generate content in a single click.
It is a great way to get started.
To use Express Mode, follow these three easy steps:
- Navigate to Settings - AI Engine and input your OpenAI API key.
- Proceed to Content Writer - Express Mode and type in your post title.
- Click the Generate button.
A popup window will appear, indicating that your content is being generated. Wait for the process to complete. Once ready, click save draft.
That's it. Your content is ready now!


Keywords
You can add specific keywords to your content.
This can be useful if you want to ensure that your content covers certain topics or concepts in a more prominent way.
The effective use of keywords is essential for creating high-quality, SEO-friendly content.
By incorporating relevant keywords into your content, you can improve your search engine rankings, drive more organic traffic to your website, and better meet the needs of your target audience.
Our content writer offers three distinct features for managing keywords:
- Add Keywords
- Avoid Keywords
- Make Keywords Bold
Add Keywords
To add specific keywords to your content:
- Go to Content Writer - Express Mode.
- Navigate to the Keywords tab on the right side.
- Use a comma to separate keywords and add them to the Add Keywords field.
For example, if you want to cover the topics of "mobile phones" and "smartphones," you would enter "battery life, cost" as the keywords.
INFO
When you enter keywords, we add an extra instruction to the prompt sent to the GPT model to produce content with those keywords. However, GPT models do not necessarily follow the instructions all the time. The inclusion of keywords depends on the GPT model and is not guaranteed. If you don't see your keywords in the generated content, it's probably because the GPT model did not adhere to your instructions.
Avoid Keywords
To avoid certain keywords in your content:
- Go to Content Writer - Express Mode.
- Navigate to the Keywords tab on the right side.
- Use a comma to separate keywords and add them to the Avoid Keywords field.

This will ensure that the specified keywords are not included in the generated content.
INFO
When you enter keywords, we add an extra instruction to the prompt sent to the GPT model to produce content without those keywords. However, GPT models do not necessarily follow the instructions all the time. The exlusion of keywords depends on the GPT model and is not guaranteed. If you still see your keywords in the generated content, it's probably because the GPT model did not adhere to your instructions.
Make Keywords Bold
To make your keywords stand out by making them bold:
- Go to Content Writer - Express Mode.
- Navigate to the Keywords tab on the right side.
- Put a tick in the checkbox next to Make Keywords Bold.
Now, whenever your specified keywords appear in the generated content, they will be bold.

AutoBlog - 3 Options: Bulk Editor, CSV, Copy-Paste
Introduction Automatic Blog Posts
AutoBlog AI is a powerful module in our plugin that leverages the latest GPT-4 models to automate various tasks.
AutoGPT is comprised of GPT Agents, which function alongside server-side cron jobs to manage and execute tasks.
With AutoGPT, you can significantly enhance your content creation, management, and optimization processes, saving both time and effort.
This tool include Bulk Editor, CSV, Copy-Paste catering to different content generation needs and preferences.
Bulk Editor
The Bulk Editor is a robust tool that enables you to produce multiple articles simultaneously, saving you valuable time and energy.
Once you enter your desired titles and hit the generate button in the Bulk Editor, our plugin takes those titles and uses default content settings from the Settings - Content tab to generate the content.
Please note that the time it takes to generate the content depends on the availability of the OpenAI API and the number of articles you have requested. Generating a single article can take around 3 to 5 minutes, which means that if you have entered five titles, it might take around 20-25 minutes to generate all of them.
Once you hit generate, that batch of titles will be added to the queue and wait to be processed.
You don't need to wait until that batch is completed before adding more batches to the queue.
Can add up to 20 titles per batch.
If you have multiple batches in the queue, the content generation process may take some time.
However, you can monitor the progress of each batch in the Queue tab and cancel a batch if it's taking longer than expected or if you no longer need the content.
Setup
To use this feature, simply follow these steps:
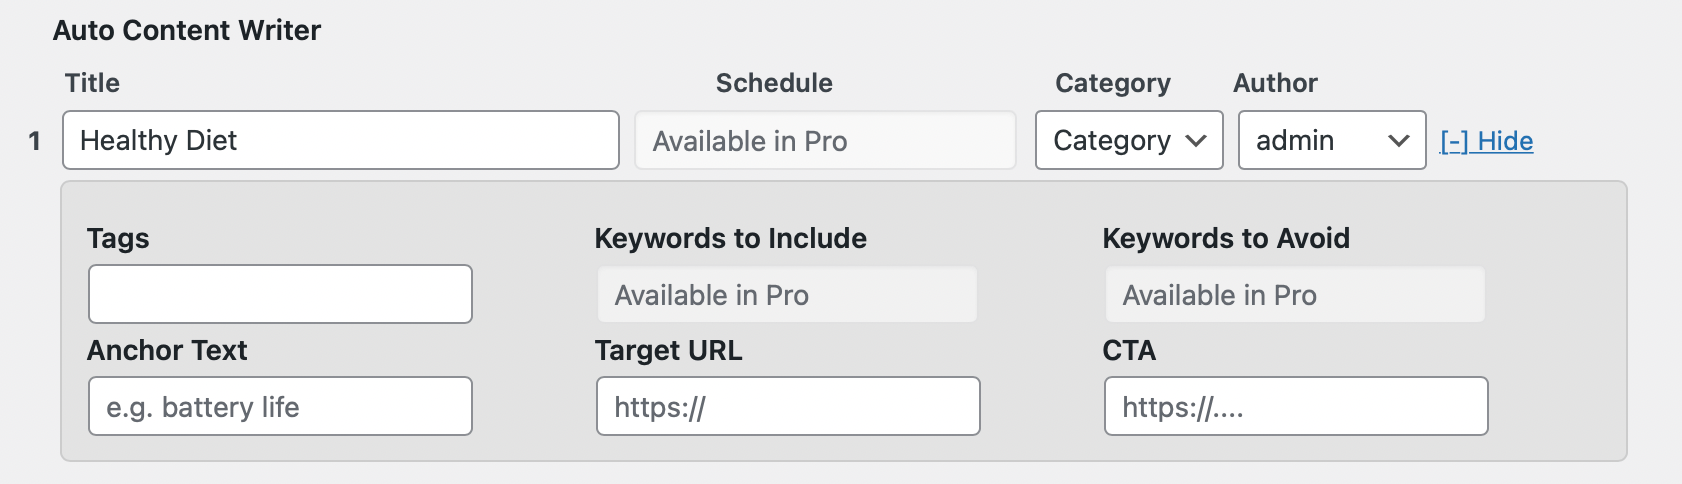
- Once you are in the Bulk Editor tab, input your desired title, choose whether to save the content as a draft or publish it immediately, select the post category, author and enter tags, anchor text, target url, call to action link and click the Generate button.
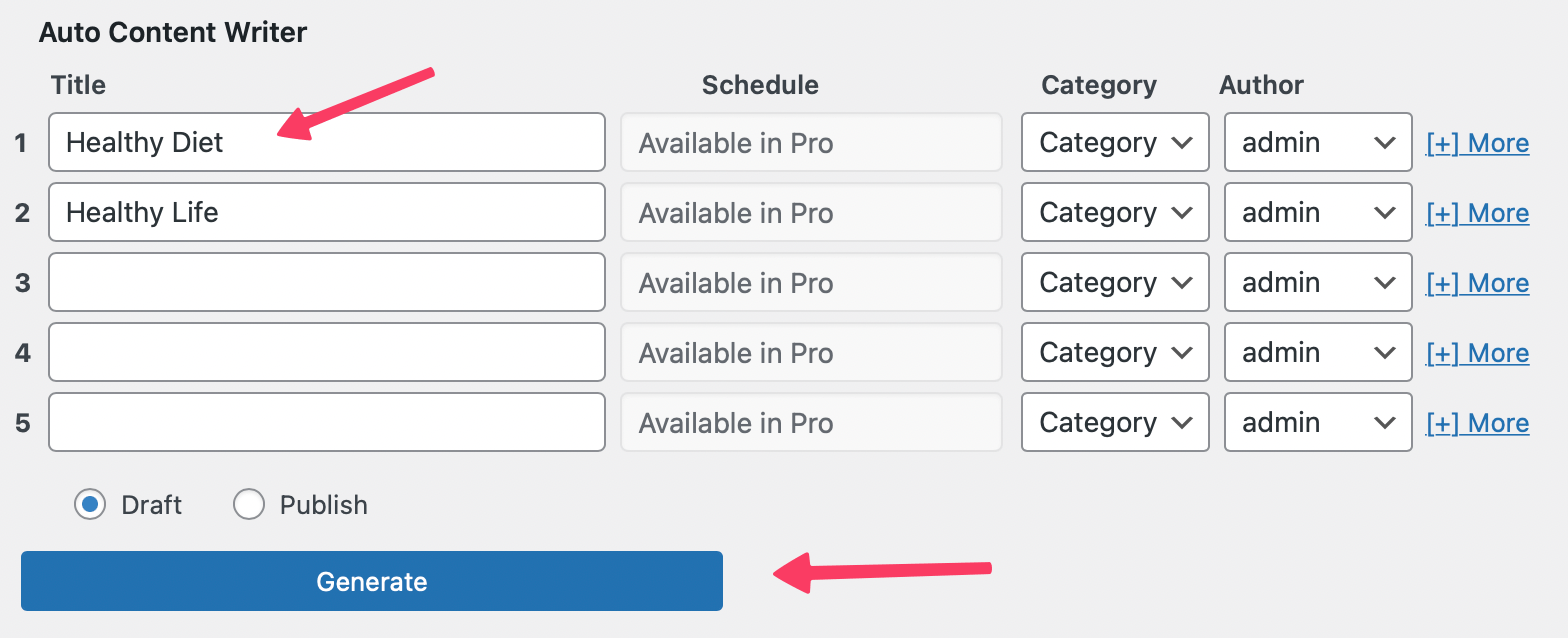
- You can also click on +More link to enrich your content with keywords and links.
CSV Import
The CSV feature in the AutoGPT plugin allows you to easily generate content for multiple titles by simply uploading a CSV file.
This powerful feature simplifies the content creation process and saves you time.
How It Works?
Once you upload your titles in a csv and hit the generate button in the CSV module, our plugin takes those titles and uses default content settings from the Settings - Content tab to generate the content. The content generation process is triggered by the Cron Job that you have set up.
Please note that the time it takes to generate the content depends on the availability of the OpenAI API and the number of articles you have requested. Generating a single article can take around 3 to 5 minutes, which means that if you have entered five titles, it might take around 20-25 minutes to generate all of them.
It's important to keep in mind that if your Cron Job is set to run every minute, it means that the generation process will be triggered every minute. However, if the previous job has not yet completed, the new job will be added to the queue and will be processed after the current job is completed.
INFO
The CSV module retrieves its default values from the Settings - Content tab. Before running a job, please ensure that you have adjusted your content settings in the Content tab to match your desired output and preferences.
Once you hit generate, that batch of titles will be added to the queue and wait to be processed.
You don't need to wait until that batch is completed before adding more batches to the queue.
If you have multiple batches in the queue, the content generation process may take some time.
However, you can monitor the progress of each batch in the Queue tab and cancel a batch if it's taking longer than expected or if you no longer need the content.
Setup
To take advantage of the CSV feature, follow these steps:
- Upload a CSV file containing the title value for each line in the CSV tab and choose whether to save the content as a draft or publish it immediately, select the post category, author and click the Generate button.
- You can monitor the progress of your content creation in the Queue tab.
Since the CSV module works with only one title per line, there isn't a need for a sample file.
However, the structure of the CSV file should look like this:
Please make sure your CSV delimiter is comma.
Copy-Paste
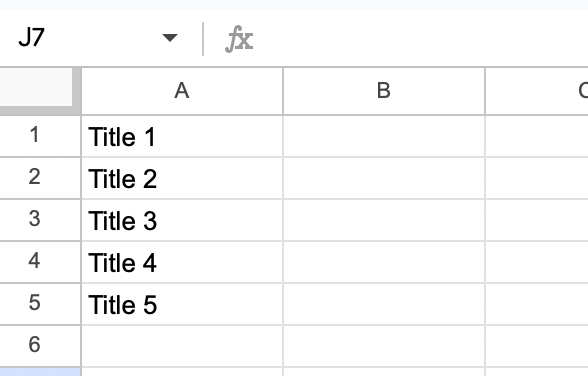
The Copy-Paste module in the AutoGPT plugin allows you to easily generate content for multiple titles by simply pasting the titles directly into the text box.
This feature simplifies the content creation process and saves you time.
How It Works?
Once you enter your desired titles and hit the generate button in the Copy-Paste, our plugin takes those titles and uses default content settings from the Settings - Content tab to generate the content. The content generation process is triggered by the Cron Job that you have set up.
Please note that the time it takes to generate the content depends on the availability of the OpenAI API and the number of articles you have requested. Generating a single article can take around 3 to 5 minutes, which means that if you have entered five titles, it might take around 20-25 minutes to generate all of them.
It's important to keep in mind that if your Cron Job is set to run every minute, it means that the generation process will be triggered every minute. However, if the previous job has not yet completed, the new job will be added to the queue and will be processed after the current job is completed.
INFO
The Copy-Paste module retrieves its default values from the Settings - Content tab. Before running a job, please ensure that you have adjusted your content settings in the Content tab to match your desired output and preferences.
Once you hit generate, that batch of titles will be added to the queue and wait to be processed.
You don't need to wait until that batch is completed before adding more batches to the queue.
You can continue to add batches to the queue until you reach the maximum limit allowed by your plan.
If you have multiple batches in the queue, the content generation process may take some time.
However, you can monitor the progress of each batch in the Queue tab and cancel a batch if it's taking longer than expected or if you no longer need the content.
Setup
To take advantage of the Copy-Paste module, follow these steps:
- Paste the desired titles into the text box, with one title per line, and choose whether to save the content as a draft or publish it immediately, select the post category, author and click the Generate button. Learn more about content settings here.
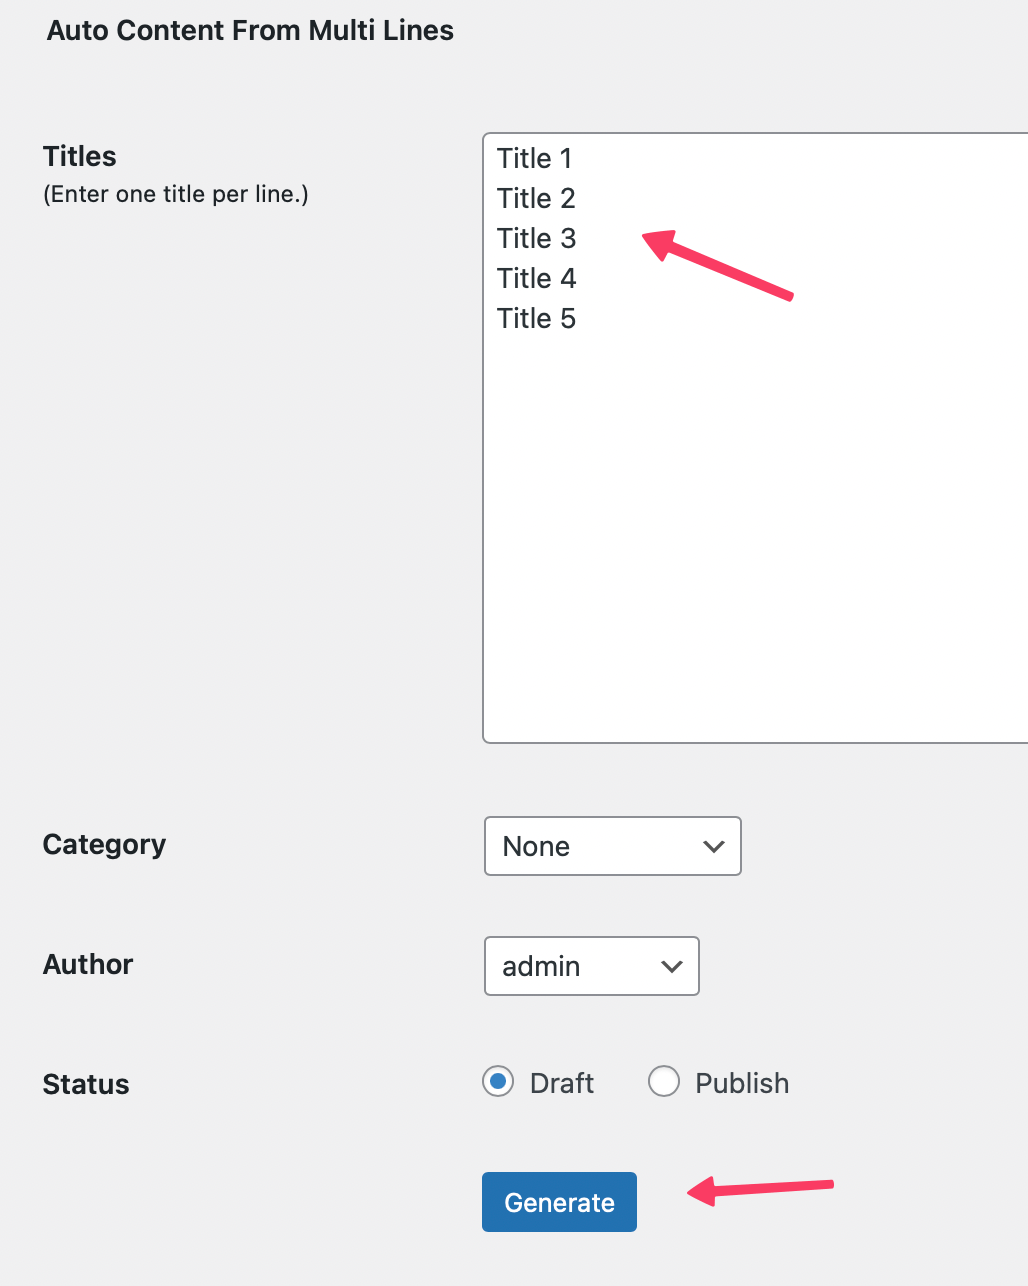
- You can monitor the progress of your content creation in the Queue tab.
PromptBase
PromptBase
PromptBase is a powerful feature in our WordPress plugin that offers more than 100 ready-to-use prompts for your website.
With this feature, you can easily search, run, and embed these prompt forms on your website to provide an interactive experience for your users.
In addition to the pre-built prompt forms, you can also design and create your own prompts using a simple interface.
You can choose from a variety of GPT models and customize the forms to suit your needs.
Using Pre-built PromptBase
To use one of the pre-built forms, simply browse through the available options in the PromptBase menu.
You can search for forms by keyword, category, or author. Once you find a template you like, simply click on it to view the details.
From there, you can copy the shortcode provided and paste it into your WordPress post or page where you want the form to appear.
The shortcode will embed the form form on your page, and your users can start interacting with it right away.
Accessing PromptBase
To access the pre-built forms, follow these steps:
- Open your WordPress dashboard.
- Navigate to the AI Power plugin menu on the sidebar.
- Click on the PromptBase tab.

Here, you'll see a search box at the top of the page. You can use this to search for specific forms based on your needs.
Browsing and Searching for Forms
The PromptBase page displays up to 40 forms per page. You can browse through these using the page numbers at the bottom of the screen. With over 100 PromptBase available, you can easily find the right form for your needs.
On the left-hand side, you will find filtering options:
- Author: This filter allows you to view forms by specific authors. By default, you'll see "AI Power (117)" which signifies 117 forms created by the AI Power plugin. If you have created any forms, your WordPress username will also be visible here, allowing you to filter forms you've authored.
- Category: This filter lets you refine your search based on specific categories such as blog, Instagram, classification, and others. Simply put a check in the box to apply the filter.

Image Generator
Image Generator
The Image Generator feature is a powerful tool that allows you to generate images using advanced AI models such as DALL-E and Stable Diffusion 🚀🚀🚀.
You can generate images from simple text prompts, adjust various settings to fine-tune your results, implement price handling, and monitor detailed logs.
We've made this feature interactive for your users with shortcodes that can be embedded in your front-end.
DALL-E
DALL-E is a deep learning model developed by OpenAI to generate digital images from natural language descriptions, called "prompts".
You can generate images from simple text prompts by using Image Generator feature.

Supports three distinct DALL-E models provided by OpenAI, each with unique capabilities and image generation features.
DALL-E 3
DALL-E 3 is the latest iteration of OpenAI's image generation models. It allows users to create images from scratch based on a text prompt.
- Image Sizes: DALL-E 3 can generate images with resolutions of 1024x1024, 1024x1792, or 1792x1024 pixels.
- Quality Settings: By default, images are generated at standard quality. For enhanced detail, you can opt for the "hd" quality setting when using DALL-E 3.
- Generation Speed: Square, standard quality images are the fastest to generate.
- Generation Quantity: You can request 1 image at a time.
DALL-E 3 HD
As an extension of DALL-E 3, the DALL-E 3 HD model offers images with high definition and intricate details.
- Image Sizes: The same as DALL-E 3, with the addition of "hd" quality for even more detailed imagery.
- Quality and Detail: This model will provide images with superior clarity and depth.
- Generation Quantity: Similar to DALL-E 3, only 1 image can be requested at a time.
DALL-E 2
DALL-E 2 is the predecessor to DALL-E 3 but still offers a robust set of features.
- Image Sizes: DALL-E 2 supports 256x256, 512x512, and 1024x1024 image sizes.
- Generation Quantity: Up to 10 images can be generated in a single request.
CAUTION
Please note that when submitting a generation request to DALL-E 3, OpenAI may automatically revise it for safety and to add more detail. Detailed prompts tend to yield higher quality images.
To use these models:
- Ensure you have the API key for DALL-E set up in the settings.
- Navigate to Image Generator and input your prompt.
- Select the desired model and image specifications.
- Hit the Generate button and await your unique AI-generated image.
- Make sure you have the API key for DALL-E and you have entered it in the settings.
- Go to Image Generator and enter a prompt in the text field.
- Click on the Generate button.
- Wait for the images to be generated.
- Simply click on an image to delve into its details. While automatically assigns the prompt as alternative text, caption, description, and title, you have the freedom to modify them as per your preference.
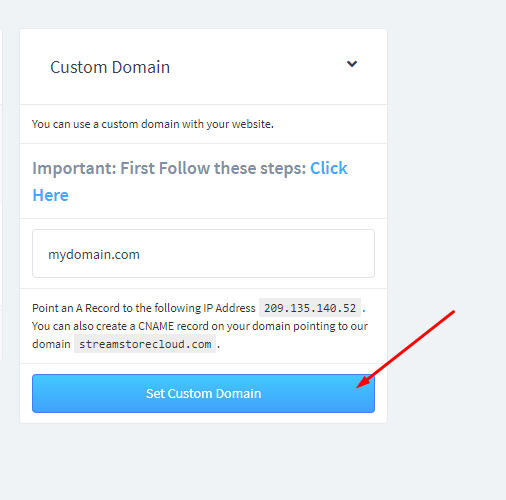
Add Domain
You can go to the side menu the tab "Account", and you will see the place to add your domain.

But...
First, you need to point "your domain" with DNS adding to the "record A" the IP: 162.246.23.43
The best way to do it is to send a ticket to your domain support and ask:
-----
Hello Support
Please, can you add to the DNS of my domain (your domain here) , the IP 162.246.23.43 to the A record?
Thank you
-----
Now, when you see on the site whatsmydns.net, the IP propagates (you see 162.246.23.43 many times in the list )
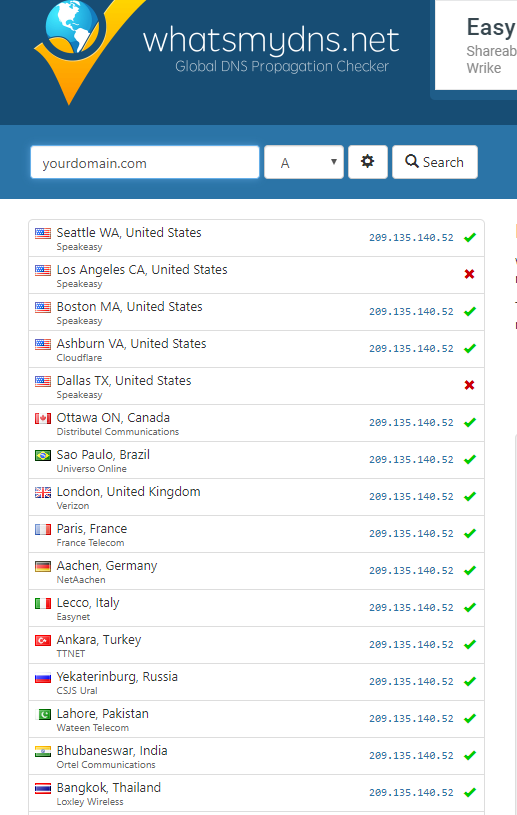
you are ready to add the domain to the Custom Domain widget and click Set Custom Domain
Sometimes can take some hours to propagate, you can check when the domain will be working going here: https://www.whatsmydns.net/ and puting your domain and verify that you see 162.246.249.129 many times in the list
When you see your domain is propagate, please, send a ticket to the Support: tech@softsengine.zendesk.com with your domain name, asking to be verified and integrated.
Thank you
Upgrade Unlimited Blogs Membership
If you need any further help, please email us :
ClickBank is the retailer of products on this site. CLICKBANK® is a registered trademark of Click Sales Inc., a Delaware corporation located at 1444 S. Entertainment Ave., Suite 410 Boise, ID 83709, USA and used by permission. ClickBank's role as retailer does not constitute an endorsement, approval or review of these products or any claim, statement or opinion used in promotion of these products. For order support, please contact ClickBank Customer Support.
This site and the products and services offered on this site are not associated, affiliated, endorsed, or sponsored by Google, nor have they been reviewed tested or certified by Google..
Ariel Sanders
"AutoBlogAI" Team
